800-450-6118
carpalrx header

Most Effective Carpal Tunnel Relief Exercises

From Dr. Z - Carpal tunnel syndrome specialist

The Best Carpal Tunnel Relief Exercises Target Flexor Tendons

The best carpal tunnel relief exercises will both prevent and treat carpal tunnel symptoms. These symptoms include:


To be effective, the exercises need to focus on your flexor tendons. These tendons run from the forearm to the fingertips. Therefore, the best carpal tunnel exercises target the fingers, wrist, and forearm areas.


Read the instructions below. Learn how to perform these simple and effective techniques on a routine basis. If you do, carpal tunnel syndrome will never be a factor in your life.


Before You Begin

The exercise instructions below are designed for both prevention and relief of carpal tunnel symptoms. Prevention means symptoms have not yet started -- but you may be at risk for carpal tunnel if you engage in harmful hand activities. (See this list of harmful handful activities.)


If you already have carpal tunnel symptoms, then these exercises should be part of a therapy regimen that includes;


For both prevention and symptoms relief, the below exercises should be performed at least 3 times daily. But the more you do them, the better your chances of getting great results.

Carpal Tunnel Relief Exercises for the Wrist
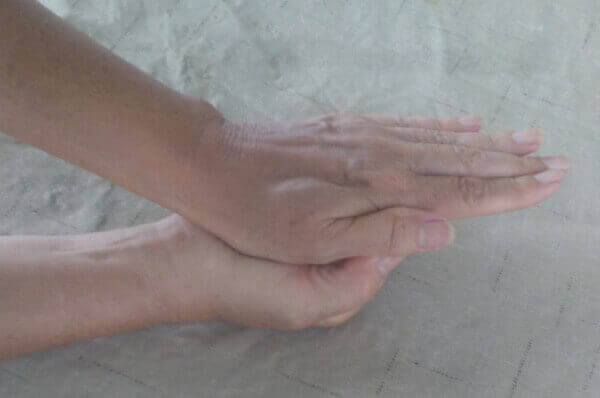
Wrist Exercise #1

interlaced fingers exercise

These carpal tunnel relief exercises for the wrist will reduce pressure inside the carpal tunnel space directly. That pressure is the underlying cause of carpal tunnel symptoms


As with all carpal tunnel exercises, start with range of motion maneuvers. For the right hand, interlace your fingers with your left hand. Then flex and extend the right wrist as far as possible – but not to the point of being painful. Then move the right wrist from side to side. Repeat this exercise once again. Then switch hands and repeat it for the left hand.

Wrist Exercise #2

hand pushing down on other hand

This exercise requires you make a loose fist with your right hand, and with the palm up. Then use the other hand to press down against the fist. 


This is a "flex resistance" exercise. Be gentle, but resist the force with the closed right hand for 5 seconds. Make sure you keep your wrist straight. Repeat this once again. Then switch hands and repeat the exercise for the other side.

Wrist Exercise #3

finger and wrist stretching exercise

The most common carpal tunnel exercise for the wrist requires you hold one hand straight up in front of you at shoulder height. Keep the fingers together and the palm facing outward (pretend you’re saying, “STOP!”). 


With the other hand, bend the STOP hand backward with fingers still held together. Hold this for 5 seconds. Then spread the fingers and thumb of the STOP hand while it’s still bent backward. Hold this position for another 5 seconds. Repeat this exercises once again, then switch hands.

Wrist Exercise #4

holding two fingers together

The final carpal tunnel wrist exercise requires you hold ONLY your index and middle fingers up while you close the other fingers. 


While holding your hand steady and halfway extended in front of you, draw 5 clockwise circles in the air with two fingertips. However, only rotate your fingers while keeping your wrist in the same place in the air in front of you. Similarly draw 5 more circles in the counterclockwise direction. Then repeat this carpal tunnel exercise with the other hand.


hand writing on a pad

Carpal Tunnel Relief Exercises for Fingers & Hand

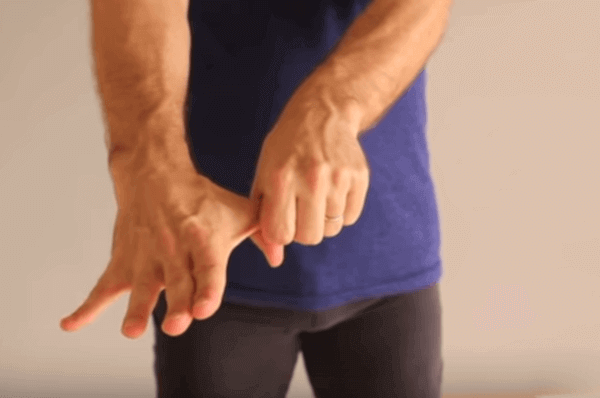
Fingers & Hand Exercise #1

exercise for the fingers

One of the best carpal tunnel exercises for the fingers and hand is to clench the fingers of both hands into a tight fist. 


Release the fingers while fanning them out. Do all this in slow motion. Repeat this process 2 times.

Fingers & Hand Exercise #2

exercise for the fingers

Don’t forget to exercise the thumb. It's usually the finger most affected by carpal tunnel syndrome. 


Effective carpal tunnel exercises for the thumb involve folding the thumb against the palm of that hand - just beneath the little finger. 


Hold it there for 5 seconds. Then spread all fingers apart. Now hold that position for another 5 seconds. Repeat this exercise with the other hand.

Fingers & Hand Exercise #3

interlaced fingers stretch

This is commonly called the "interlaced fingers stretch" for obvious reasons.


Interlace the fingers of both hands. Then rotate your wrists so that your palms are facing outward and away from you, while simultaneously straightening your elbows.


Push outward with enough force to feel your fingers stretch without being painful. Hold the position for 5 seconds. Drop you hands at your sides and shake them out briefly. Then repeat this carpal tunnel exercise once more.

Fingers & Hand Exercise #4

thumb stretching  exercise

Another easy and effective carpal tunnel exercise for the thumb is to gently pull it out and back. 


Hold the thumb in this position for 5 seconds and relax. Do this 5 times. Repeat this exercise with the other hand. 


Do not force this exercise! Also, you may hear or feel cracking or popping at the joint. This is normal.

Carpal Tunnel Relief Exercises for the Forearm

prayer stretch exercise

It’s essential to exercise the forearm which contains all of the hand’s flexor tendons. These are the tendons which cause carpal tunnel syndrome when they become restricted.


An effective exercise for the forearm is to put both hands together in front of your chest with fingers pointing upward. This is the “prayer position”. Keep both palms flat together and then raise both elbows to stretch out the forearm muscles. 


Stretch them for 10 seconds. Then drop your hands. With both hands limp at your sides, gently shake both hands out for a few seconds to loosen them up. Repeat these relief exercises regularly when arms and hands get tired from over-activity.

Carpal Tunnel Relief Exercises for Neck & Shoulders

Neck & Shoulder Carpal Tunnel Relief Exercise #1

neck and shoulder exercise

It’s helpful to perform carpal tunnel relief exercises to loosen neck and shoulder joints. That's because they contribute to carpal tunnel syndrome indirectly.


Sit upright and put your right hand on top of your left shoulder. Hold that shoulder down and slowly tip your head down toward the right side. Keep facing forward or turned slightly to the right side if possible. 


Gently hold this stretch for 5 seconds. Repeat this exercise on the opposite side.

Neck & Shoulder Carpal Tunnel Relief Exercise #2

neck and shoulder exercise

The final exercise will also greatly help relieve carpal tunnel symptoms. This exercise helps loosen tissues in the neck and shoulders. And this area contributes to getting carpal tunnel syndrome.


Stand in a relaxed position with both arms at your side. Shrug both shoulders up and then squeeze both shoulders backward, in an exaggerated "at attention" position. Then stretch both shoulders downward, and then press them forward. 


You’re essentially making circular motions with each shoulder. Do this this carpal tunnel exercise for 5 complete rotations.

Summary

Carpal tunnel relief exercises are divided into routines for your 1) wrist, 2) fingers & hand, 3) forearm, and 4) neck & shoulders. If you perform these exercises on a regular basis (2-3 times per day) you can effectively relieve symptoms of carpal tunnel syndrome. Better yet, if you're prone to (or at risk for) getting this disorder, these exercises can prevent it from ever happening in the first place.

Share by: